Xoradora Workflow Manual
Preface
This guide is automatically generated from Xoradora's internal work documents and source code, then lightly proof-read by the developer. Xoradora is made and maintained by one person, so a guide of this scope cannot realistically be maintained entirely by hand; occasional omissions, ambiguities, or mistakes may remain.
For additional questions—or anything this guide leaves unanswered—write to dev@mutagene.net. Messages will be answered by a human, to the extent the developer's available time allows.
First ten minutes
- Load a hit onto a pad and trigger that pad at its Root note.
- Open Pad Detail. Use Guided when you are learning a model or looking for a control; use Compact when you already know the model and want the controls and modulation matrix together.
- Set Morph to 0% before comparing models. This exposes each model's neutral reconstruction. It is not a bypass, so two neutral models are not expected to sound identical to the sample or to one another.
- Before judging neutral, use full trim, Playback Start at 0%, Coarse/Fine at zero, ordinary output settings, and no envelopes or modulation.
- Change one thing, retrigger the pad, and listen for the part of the hit that moved. A currently ringing voice may retain values captured when it was triggered.
Use the two views for different jobs
The switch changes presentation, not sound. Morph remains available in either view.
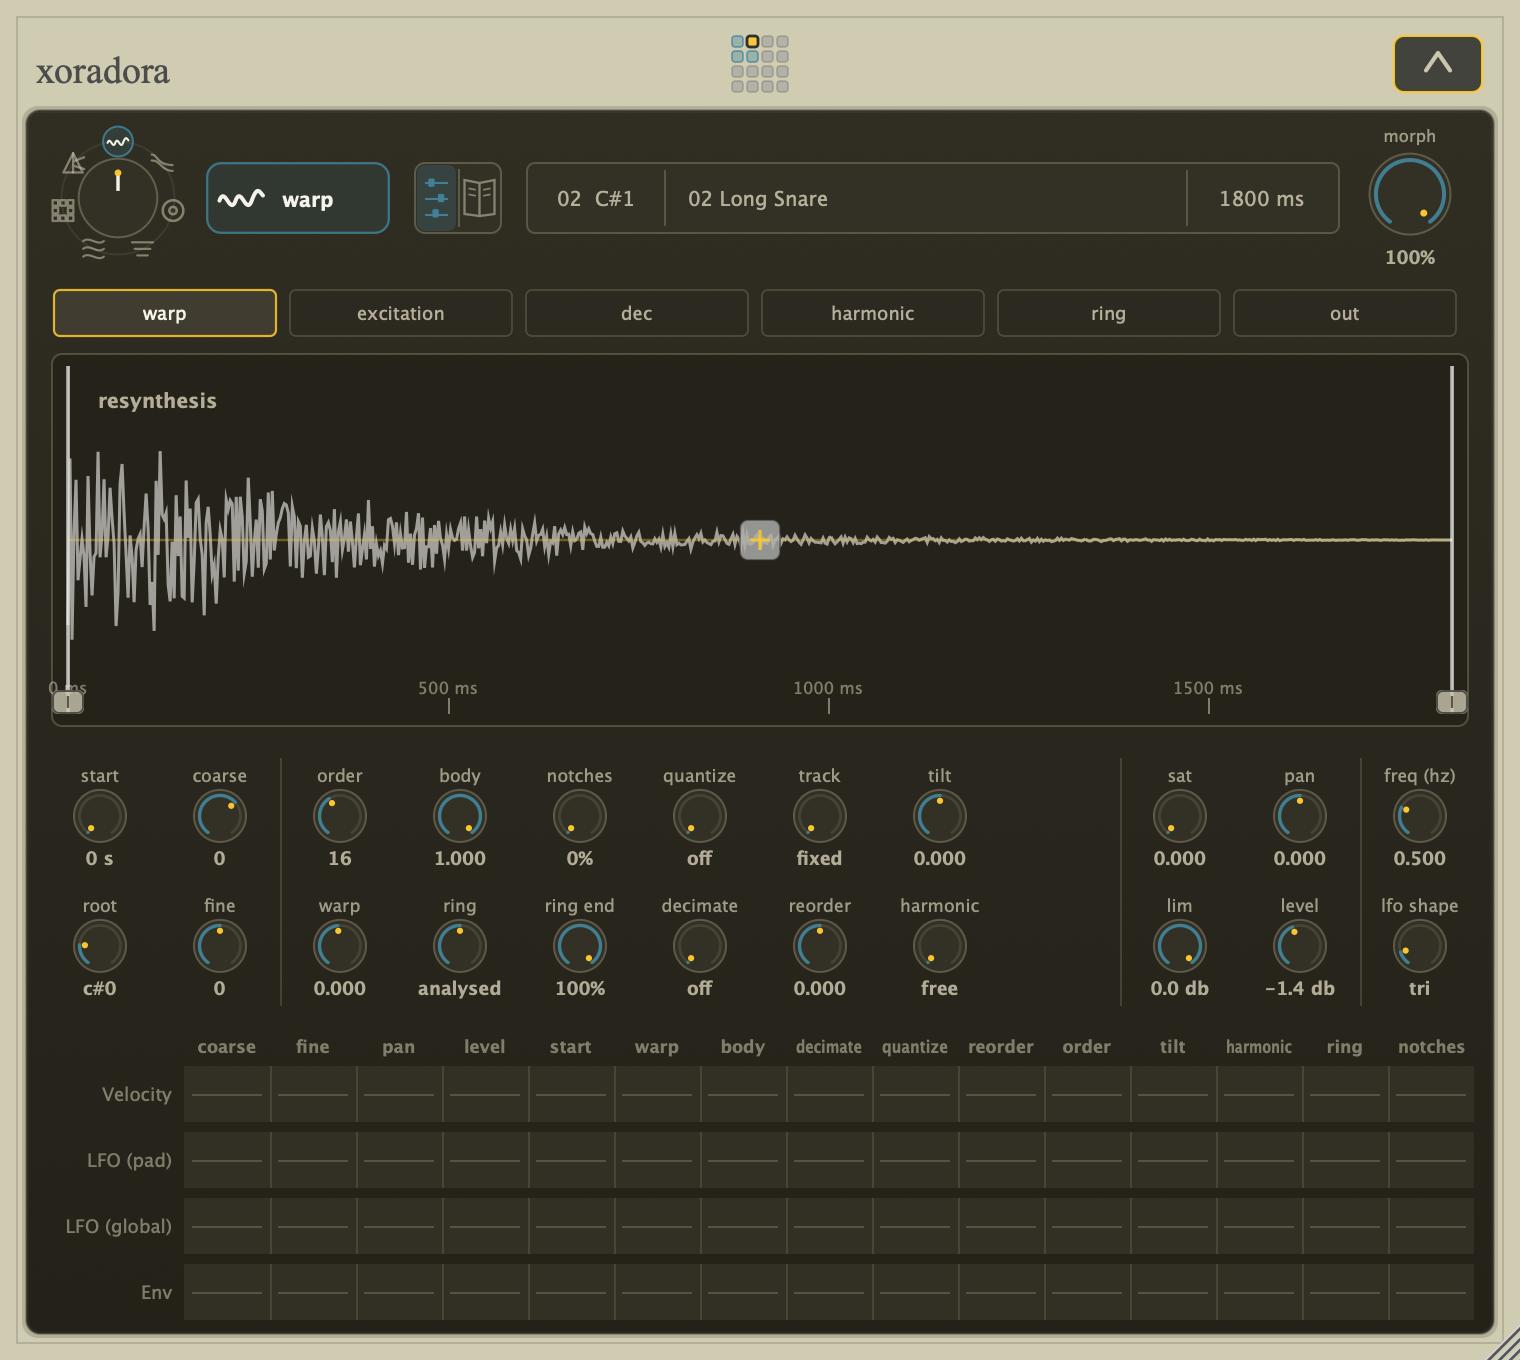
- View: switch to Guided whenever a label or interaction is unclear.
- Morph: use 0% for neutral and 100% for the stored model design.
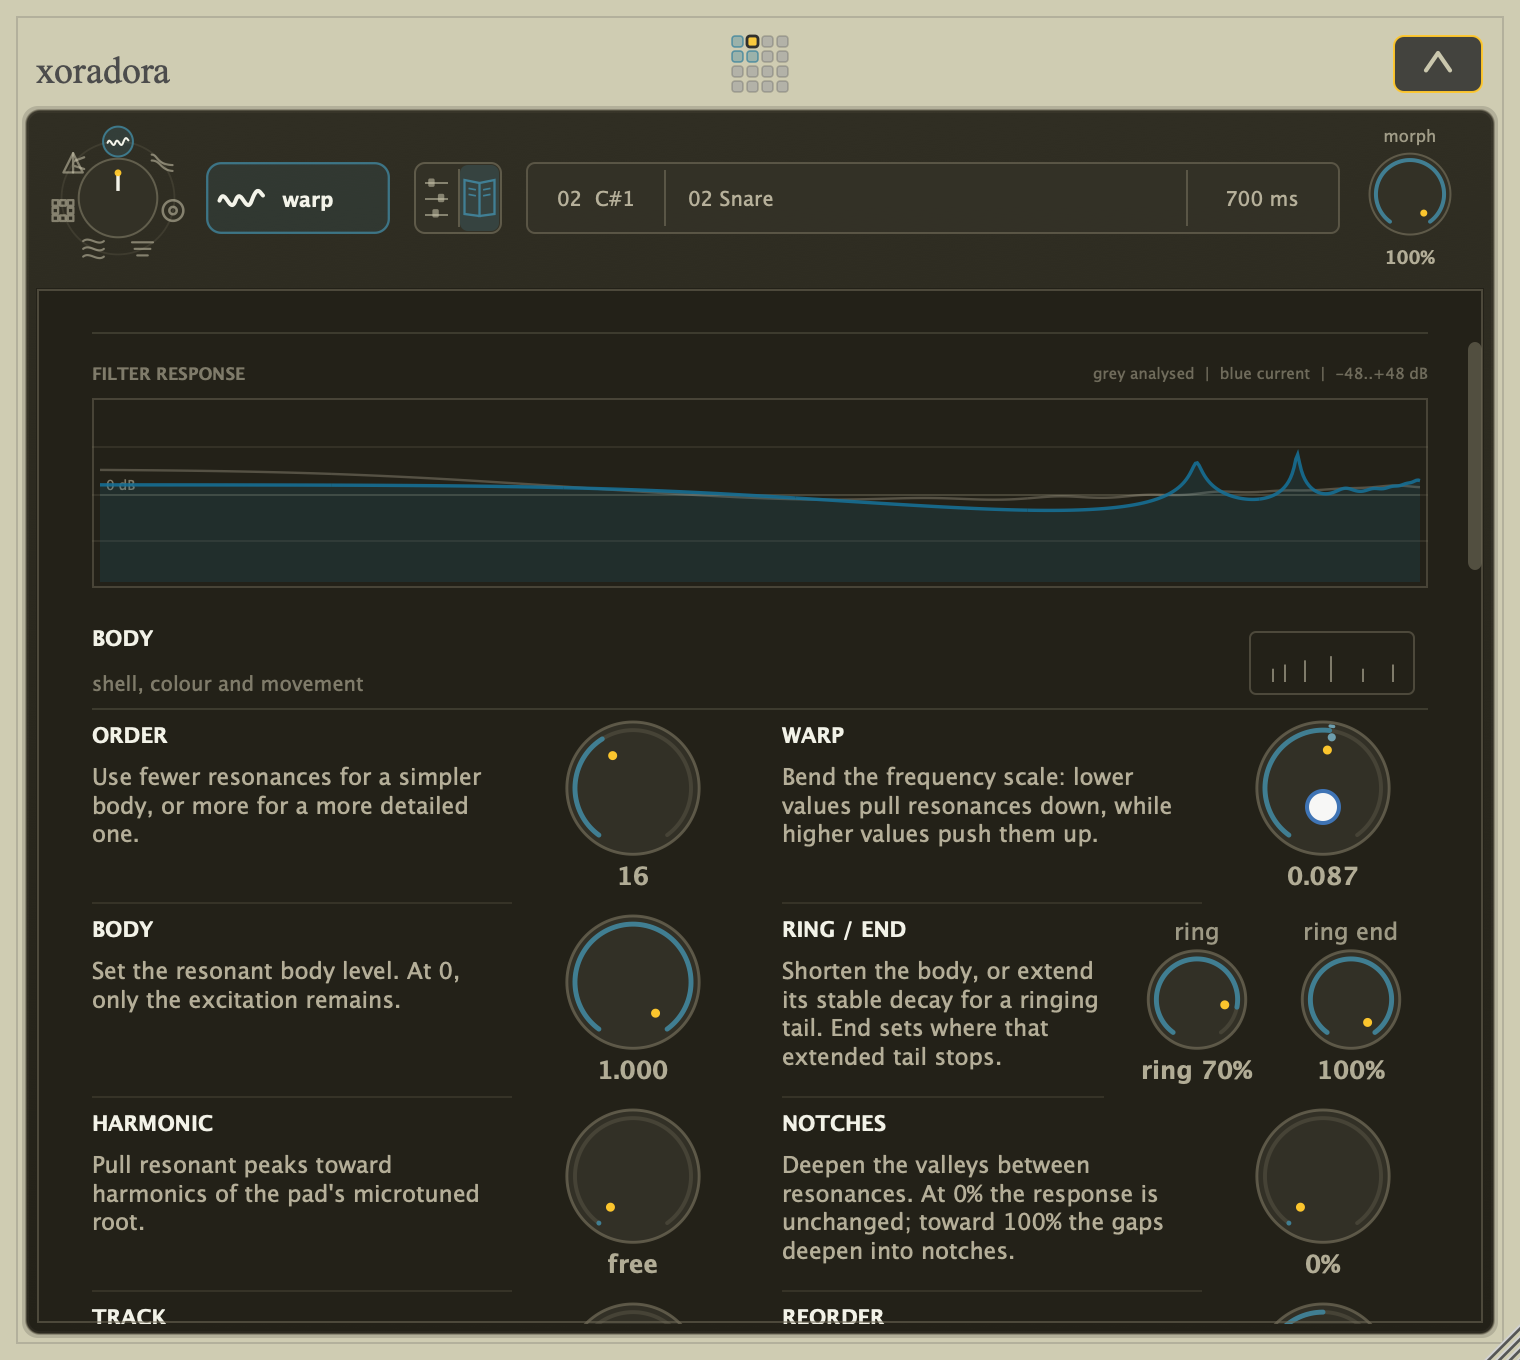
- View: return to Compact without changing the sound.
Trigger pads from MIDI
Open Triggering from the header, or press T. Use this page to:
- choose which MIDI notes reach each pad;
- set the Root note that plays the pad without chromatic transposition; and
- choose how Note Off and repeated triggers behave.
Make one pad chromatic
- Select the pad in the 4×4 grid.
- Drag the blue range strip to move its whole MIDI zone, or drag either blue edge to change Low/High. The grey strips show other pads' zones.
- Set the yellow Root by Shift-dragging on the piano. The Root is the note that plays the pad at its stored Coarse/Fine pitch; notes above or below it transpose from there.
- Click or drag across the piano to audition the actual mapping. Incoming MIDI notes and held notes illuminate there too.
- Leave the other pads on their own notes if only this pad should be chromatic. Deliberately overlap zones when one key should layer several pads.
Pad taps and sequencer steps audition a pad at its current Root, so they remain the untransposed reference after mapping changes. Moving Root changes which external note is untransposed; it does not replace the pad's Coarse/Fine setting.
Choose one-shot, gated, or stacked playback
- Use T (Trigger) for the usual drum-machine behaviour: MIDI Note Off is ignored, so the hit plays to its natural end unless it is choked or its voice is stolen.
- Use G (Gate) when releasing the external MIDI key should end the matching voice.
- Leave Mono on when a new hit should fade the older voice on the same pad. Turn it off when repeated notes should overlap polyphonically.
- Use choke groups on the main pad screen for relationships between different pads, such as a closed hat stopping an open hat. Choke, Mono, and Trigger/Gate are independent decisions.
Read the Triggering screen as a signal path
Select a pad, define where MIDI reaches it, choose its untransposed reference note, then decide how repeated notes and note-offs behave.
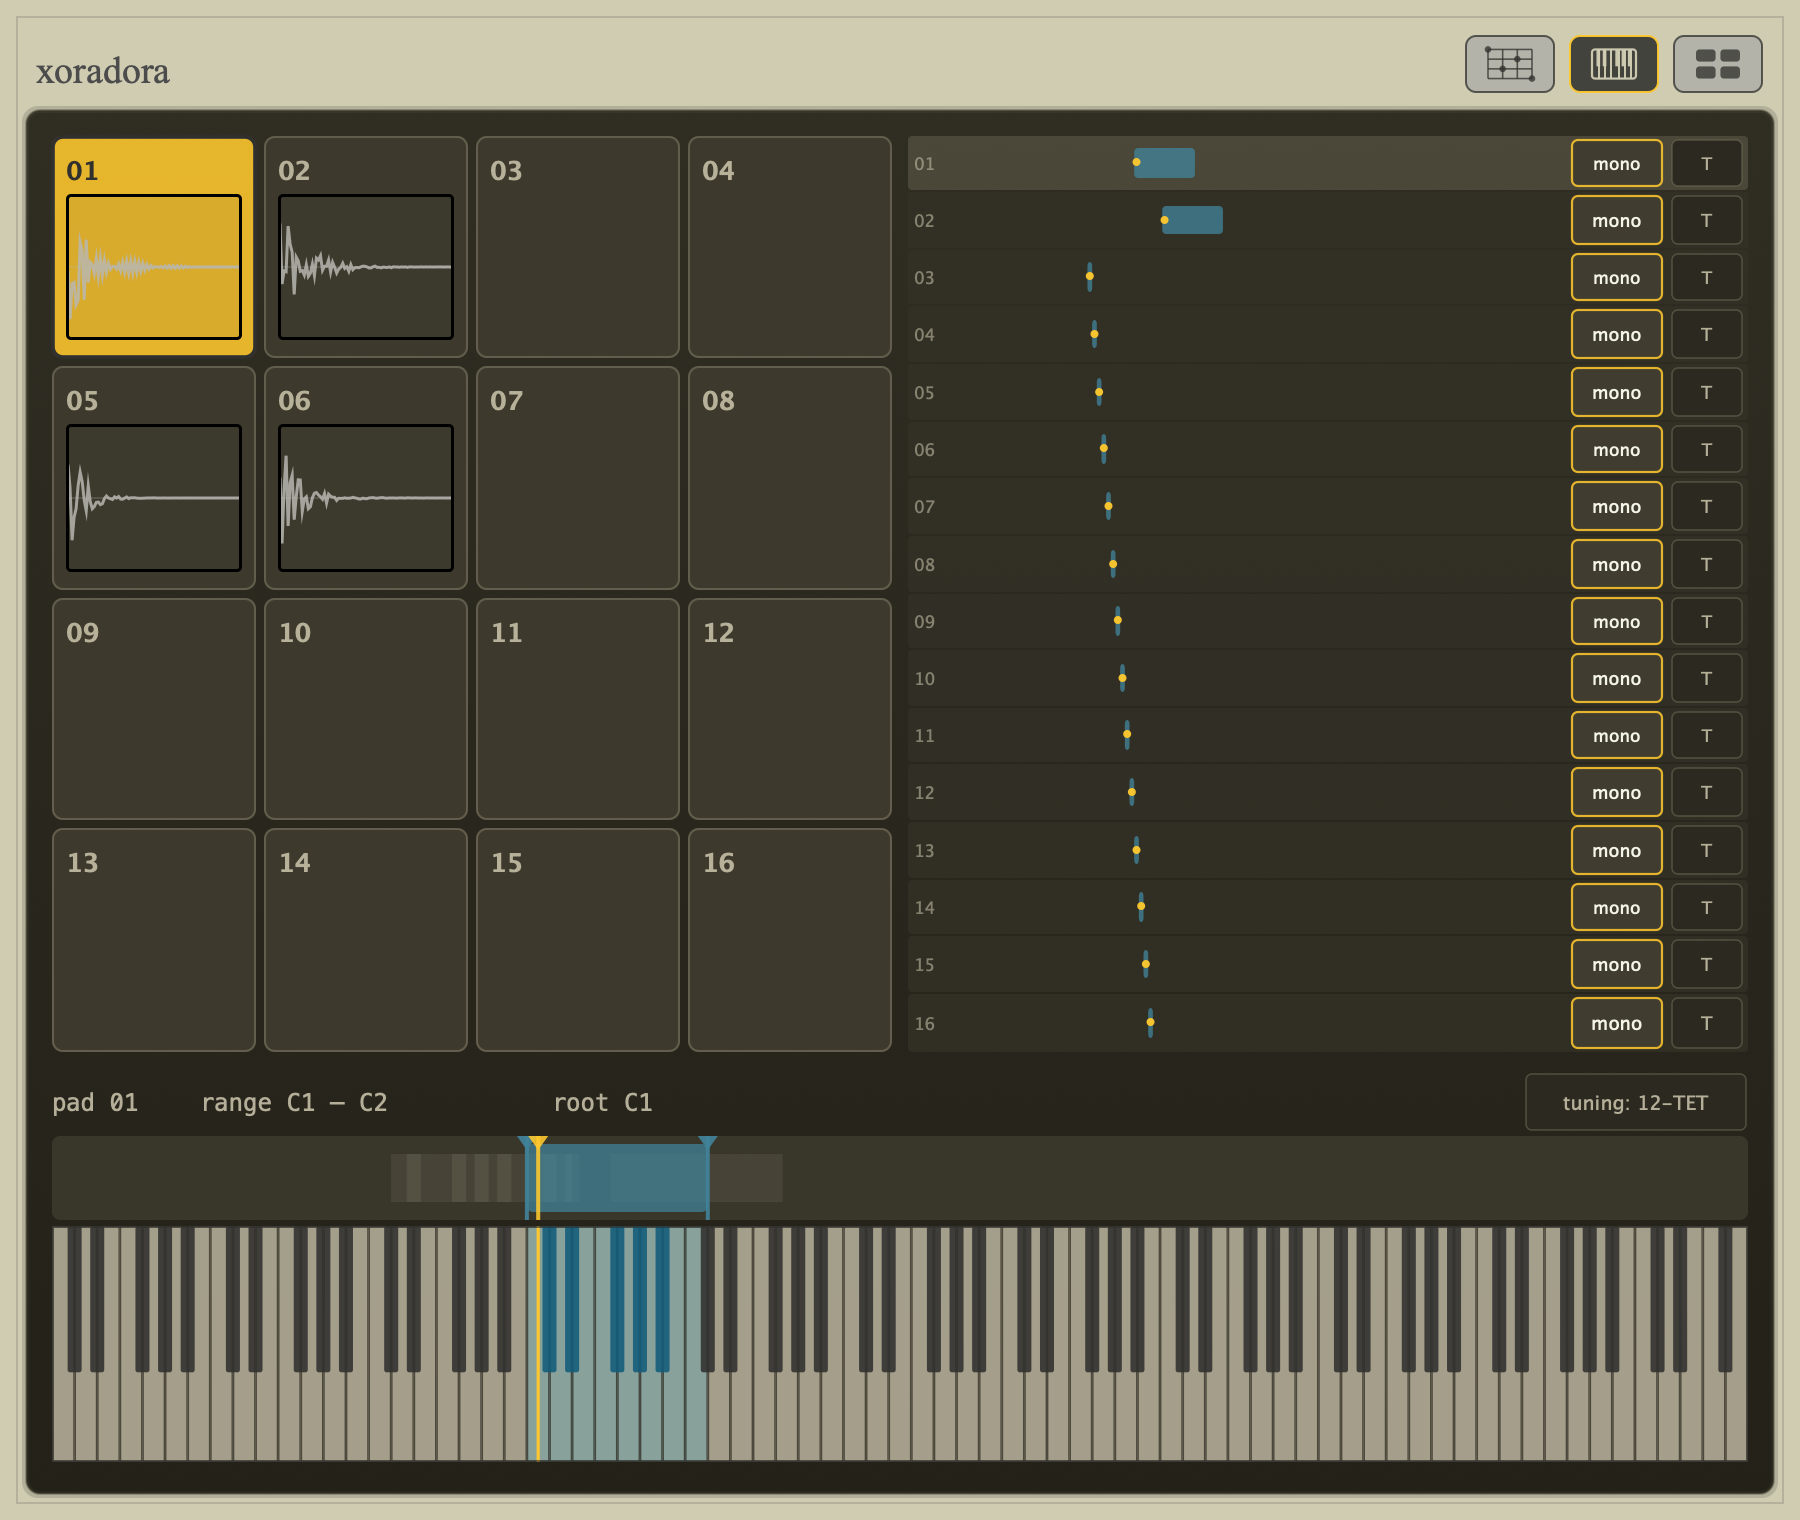
- Pad selector: choose the pad whose mapping you are editing; arrows move the selection.
- Zone overview: compare all 16 mappings and set each pad's Mono and Trigger/Gate behaviour.
- Selected zone: move the blue body or drag its edges; the yellow line shows the Root inside it.
- Audition keyboard: hear chromatic transposition and layered overlaps; Shift-drag here to place Root.
- Enable a MIDI device in the DAW, or in the Standalone audio/MIDI settings.
- Xoradora V1 listens omni; it does not currently use sustain, pitch bend, or MPE.
- A sounding voice keeps the MIDI origin and playback mode captured at its trigger. Mapping edits affect the next trigger rather than redirecting a held note.
Menus and right-click actions
On desktop, right-click—or Control-click on macOS—to open the menu for the surface under the pointer. Menu labels are deliberately compact and cannot provide the hover explanations used by Xoradora's ordinary controls, so this section describes both the action and what state it changes.
| Where you click | Menu you get |
|---|---|
| a pad on the main screen | that pad's sample, routing, sound, transfer, bounce, and view actions |
| unused space on Pads or anywhere on Triggering | the global kit, tuning, display, triggering, remote, and licence menu |
| the pad-detail surface | source/resynthesis audition, display, trim, bounce, template, mutation, and reset actions |
| the sequencer grid or surrounding sequencer surface | copy or clear the current 16-step bank, or clear the pattern |
| a choke-group or output-bus bin | clear that group, or return every pad on that auxiliary bus to Master |
| a modulation row | reset every destination in that source row to zero |
The pad menu
The pad menu is the main transfer and routing hub. Right-click the pad you intend to act on; it does not have to be the currently selected pad.
| Item | What it does |
|---|---|
| Edit pad | opens Pad Detail for that pad |
| Sample → Load / Remove | replaces or clears the pad's sample; Current is a read-only status line |
| Mute / Solo / Clear all solos | changes audition and playback policy without deleting the sound |
| Routing → Choke groups | lets one pad belong to several choke groups; Clear choke groups removes all of that pad's memberships |
| Routing → Output bus | assigns the pad to exactly one output bus; voices already sounding keep the bus captured when they were triggered |
| Sound → Tune to root | adjusts Coarse/Fine from the stored pitch estimate and current tuning map without moving Root or the MIDI zone |
| Sound → Mutate / Evolve toward | opens an interactive mutation session, or searches toward the sound of another loaded pad |
| Sound → HQ mode | appears for Strand and prepares its 48-partial tier; new voices use it when the background result is ready |
| Copy to | duplicates the sample and complete pad state into another pad, after confirmation when the destination already contains a sample; Root follows the copied pad, while the destination's Low/High trigger zone remains separately managed on Triggering |
| Pad template | imports, exports, or copies sample-independent .xorapad sound settings; it does not replace the destination sample, choke/output routing, mute, or solo state |
| Bounce to | renders the audible root-note result into new audio; In place, Empty pad, and a chosen Pad create a managed 32-bit WAV and reset the destination controls around it, while File… writes a 24-bit WAV to the location you choose without replacing a pad |
| View | changes the shared waveform/spectrogram and colour preference, or opens this pad directly in Guided view |
| Keyboard Play | enables or disables the Standalone computer-key performance mapping |
- Managed pad bounces are stored under
~/Library/Application Support/Mutagene/Xoradoraon macOS and%LOCALAPPDATA%\Mutagene\Xoradoraon Windows. The global menu's Show managed sample library command opens this root. - With no active named kit, the WAV is placed under
Session/Samples/<unique-id>/. After a.xorakithas been loaded or exported, new bounces go under<kit-name>.xorakit/Samples/<unique-id>/inside the managed root. - The DAW session stores a reference to this managed WAV, not the WAV audio itself. Do not move or delete managed files by hand. Export a portable
.xorakitwhen the audio needs to travel with the kit to another machine. - File… is different: it writes directly to the path selected in the save dialog and does not add that WAV to Xoradora's managed library.
The global menu
Right-click unused space on the main Pads screen. The same menu appears from a right-click on Triggering, where its Triggering entry changes to Reset all trigger mappings.
| Item | What it does |
|---|---|
| Import kit | replaces mapped pads from a .xorakit, folder, loose audio files, SFZ, or Hydrogen kit; an occupied kit is confirmed before replacement and the completed import is one undoable operation |
| Import & mix | opens an A/B chooser instead of replacing immediately; keep the current A pad or assign any available imported B pad to each destination, audition the choices, then Apply them as one undoable mix |
| Export .xorakit bundle | writes the portable kit: bundled samples, pad state, MIDI mappings, main pattern, mixer state, and starter attribution data |
| Export local kit metadata | writes paths and settings without copying audio; useful on one machine, but not a portable sharing format |
| Clear all | immediately resets all sixteen pads and clears the sequencer pattern as one undoable edit; if selected accidentally, use Undo before making unrelated edits |
| Show managed sample library | opens Xoradora's owned sample-storage folder on desktop; moving files out of it can break saved references |
| Microtuning | enables tuning, loads .tun/.scl, selects Local File or MTS-ESP Follow, and shows the current tuning status |
| Triggering / Reset all trigger mappings | opens Triggering from the main screen, or restores the original MIDI 24–39 one-note layout while already there |
| Waveform / Spectrogram / Monochrome / Colour | changes the shared display preference used by pad thumbnails, detail, and output scopes |
| Keyboard Play / Phone Link / License | manages Standalone keyboard performance, the local-network phone remote, and licence entry/status |
Desktop-only folder, loose-file, local-metadata, and managed-library actions are omitted where the platform cannot offer them.
The pad-detail menu
Right-click the detail background, a normal detail control, or an empty part of the waveform. Right-clicking an envelope point is the important exception described below.
| Item | What it does |
|---|---|
| Audition source / Audition resynthesis | temporarily compares the original sample path with the reconstructed result; this is not a bypass parameter or a saved edit, and leaving detail returns to resynthesis |
| View / Guided view | changes the shared display palette or toggles the explanatory Guided surface without changing sound |
| HQ mode | appears in Strand and requests the prepared 48-partial result |
| Trim to playback range | makes the current Playback Start and playback-end marks the pad's non-destructive legal range, then renormalises the handles without changing the audible result |
| Clear trim | reopens the whole source while preserving the handles' absolute positions |
| Normalize sample | scales the decoded sample to full-scale peak and reruns its analysis; the operation is undoable |
| Bounce → In place / To file | replaces the pad with managed rendered audio, or writes a 24-bit WAV without replacing it; the render follows the current source/resynthesis audition choice |
| Template → Export / Import | saves or applies sample-independent .xorapad settings |
| Mutate sound | starts the candidate-based sound mutation workflow |
| Reset pad parameters | after confirmation, resets the pad's shared and mode-specific parameters, modulation, and placement offsets while preserving its sample and selected Resynthesis Mode |
Sequencer, routing, modulation, and envelopes
- Right-click the Sequencer to copy the visible 16-step bank to another available bank, clear only that bank, or clear the entire pattern. Cells and velocity levels are copied together, the destination bank opens after a copy, and every action is undoable.
- The 16/32/64 steps button is a left-click menu that changes pattern length. The MIDI button copies the active pattern to the clipboard/paste buffer or saves it as a MIDI file using each pad's Root and the stored step velocities.
- Right-click a choke-group bin to clear every pad assignment from that group. Right-click an auxiliary output-bus bin to move every pad on that bus back to Master. Both are undoable.
- Right-click a modulation matrix row and choose reset row to return every destination for that source to zero. Double-clicking one matrix cell resets only that cell.
- Right-click directly on an editable envelope point to delete that point immediately. No menu or confirmation appears; the deletion is undoable. Right-click elsewhere in the waveform opens the ordinary pad-detail menu.
- On the compact phone layout, the explicit menu and route buttons provide the global menu and the selected pad's choke/output choices without requiring a right-click.
Choose a model by the job
| If you want to… | Start with | Why |
|---|---|---|
| reshape a resonant body while retaining its noisy attack | Warp | it separates excitation from a changing all-pole resonator |
| retune or rematerialise identifiable ringing tones | Hull | it separates a modal body from attack, noise, and uncaptured detail |
| hold, slow, or exaggerate broad spectral colour | Halo | it separates broad colour from its fine carrier |
| move low, mid, and high-frequency gestures independently | Prism | it follows complementary frequency regions separately |
| create codec-like holes, smear, pre-echo, or aliasing | Grain | it works with overlapping transform slices |
| remix strike, body, air, and tail as musical roles | Strata | it groups learned layers by their role in the hit |
| edit stable tones, tonal texture, attack, and noise separately | Strand | it exposes four different reconstruction paths |
This is a starting-point map, not a boundary. Once a model is chosen, use Guided view for its controls. If changing mode seems to do nothing immediately, retrigger after its analysis is ready.
Tune a drum to the track
For a kick, tom, bell, or other hit with a stable ringing body:
- Decide which MIDI note should play the drum at its target pitch and set the pad's Root to that note.
- For ordinary tuning, use Coarse and Fine. For a microtonal song, open the global tuning control, load a .tun or .scl map or choose MTS-ESP Follow, and enable microtuning for the pad.
- Choose Sound → Tune to root (current map) from the pad menu. Xoradora uses the stored pitch estimate to choose a Coarse step and the smallest remaining Fine correction. The action is undoable and does not move Root.
- Retrigger at the Root note and listen to the ringing body, not only the attack. A noise-heavy, very short, or strongly swept drum may need tuning by ear.
- If the body still sounds unpitched, organise the model itself: Warp Harmonic aligns resonant peaks; Strand Harmonic aligns tracked partials. This is separate from transposing the pad.
Keep the pitch decisions separate
Root and Coarse/Fine establish the played reference. Ring makes a Warp body persist. Harmonic gives that persistent body an organised pitched structure.
- Root: choose the MIDI note that represents the drum's target pitch.
- Coarse/Fine: tune the pad against that reference and the active tuning map.
- Ring: make enough resonant body audible to judge its pitch.
- Harmonic: organise that body around the played pitch and its integer multiples.
- Coarse/Fine plus the tuning map set the pad's playback reference.
- Hull Tune, Strand Partial Tune, or Residual Tune move one reconstructed layer relative to that reference.
- Harmonic organises resonances or partials; it is not a simple transpose.
- Time Stretch changes a component's timeline and may reverse it; it does not establish the note.
Change the body without losing the strike
Several models separate the resonant or sustained body from an attack or source-like path. If a body edit weakens the original strike, restore some of the corresponding path below before compensating with broad gain or brightness.
- Make the body change first, even if the result temporarily sounds dull.
- Restore the model's attack or source-like path until the hit reads correctly.
- Match playback levels before comparing the versions; a level difference can bias the comparison.
- Only then add output saturation, Voice Ceiling, or extra brightness.
| Model | Attack or source-like path to restore |
|---|---|
| Warp | the excitation path |
| Hull | Residual |
| Halo | the original fine carrier through Colour Mix |
| Prism | Onset, with Glue when the bands have drifted apart |
| Grain | Transient |
| Strata | Strike |
| Strand | Transient, often with some Noise |
Shared output headroom
Every pad has a shared output chain after its selected resynthesis method. The controls are normally left at their defaults, but they provide a useful escape route when an extreme reconstruction is too hot. The compact output block keeps Saturation, Voice Ceiling, Pan, and Level in a 2x2 arrangement. For non-Warp modes, Pre-Saturation Gain is available in Guided view:
| Control | What it does |
|---|---|
| Pre-Saturation Gain | Applies a per-pad trim from -inf to +6 dB after reconstruction and envelopes, before Saturation and Voice Ceiling. It is shown in Guided view for non-Warp modes. |
| Saturation | Adds the optional post-reconstruction tanh colour, with a fixed per-voice safety rail. |
| Voice Ceiling | Applies a fixed per-voice gain and clamp before pad Level and Pan. It is not a dynamic final-output limiter, so overlapping voices or boosted Level can still exceed the final bus headroom. |
For Warp, use Excitation Level first: it trims the signal from -30 dB to
+6 dB before the resonator and is therefore the more meaningful control for
high Ring settings.
Because the signal path is approximately linear before these nonlinear output
stages, Pre-Saturation Gain and Excitation Level are broadly equivalent as
level trims, but they act at different points in the sound-design chain.
Reducing Level afterward cannot undo clipping that already happened in
Saturation or Voice Ceiling.
Morph, modulation, and host automation
These three systems solve different problems:
| System | Use it for | Important consequence |
|---|---|---|
| Morph | revealing the complete stored model design from neutral | it is a macro over model shaping, not a bypass |
| Modulation matrix | velocity-, LFO-, or follower-driven variation within the instrument | it is generated during playback and can vary per hit |
| Host automation | exact movement on the DAW timeline | the host writes one named parameter lane |
| Envelopes | a repeatable shape over each hit | they are edited from the main view and follow the hit rather than song bars |
For a predictable Morph:
- Build the intended sound at Morph 100%.
- Check Morph 0% so you know the neutral endpoint.
- Automate Morph when you want the whole design to arrive together.
- Automate an underlying parameter when only one audible quality should move.
- Avoid automating Morph and one of its underlying controls at the same time unless the interaction is deliberate.
Morph generally does not include tuning, Playback Start, level/pan, output routing, or Resynthesis Mode selection.
Choose one source of movement first
Start with Morph, the internal matrix, an envelope, or a DAW lane. Add a second system only after the first movement is understandable.
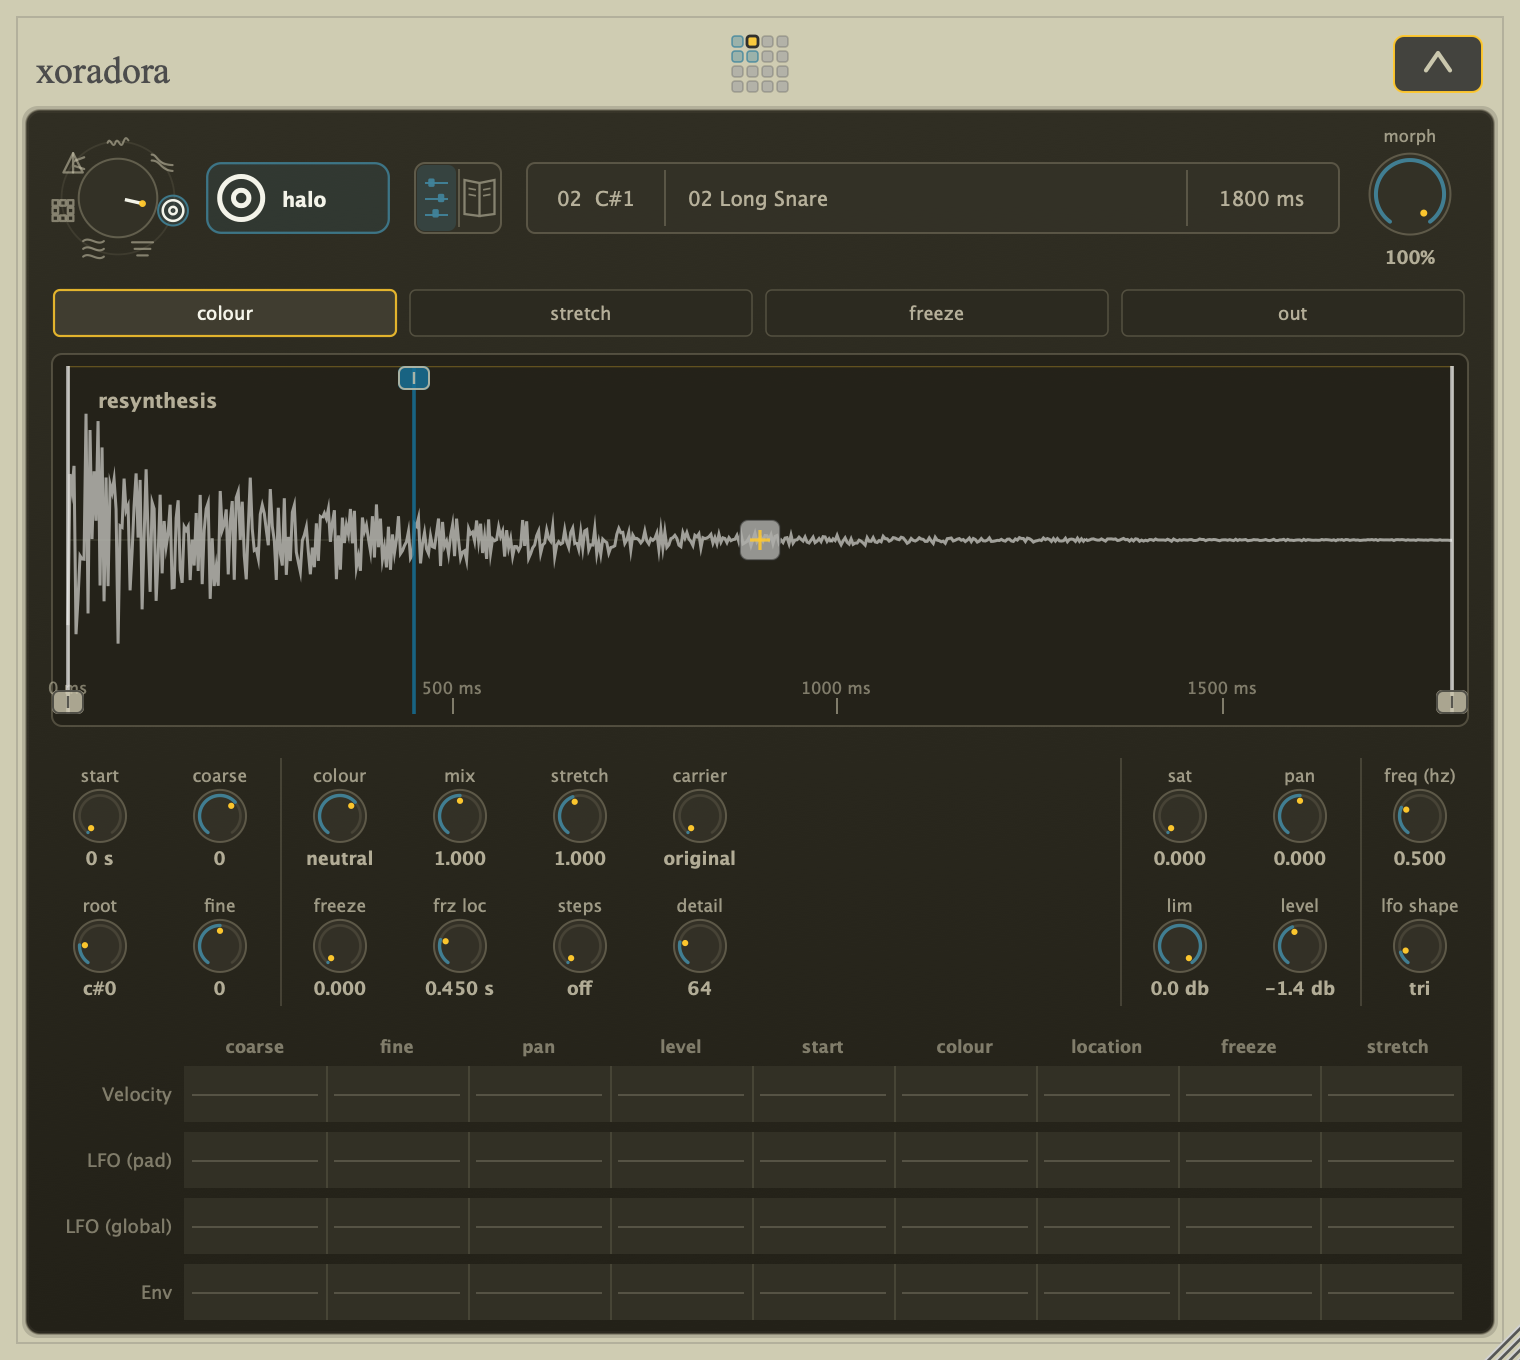
- Morph: reveal the stored model design as one gesture.
- Matrix: add per-hit or continuous variation after the basic sound is working.
- Choose the pad and model before recording automation.
- Touch the intended control so the host exposes the correct lane.
- Record or draw values using the displayed unit when the host supports it.
- Retrigger after routing or trigger-latched changes.
Hear what the separated parts are doing
Strata and Strand are easiest to learn by isolation, but isolation is only a diagnostic step.
For Strand:
- Lower Transient and Noise enough to hear the tonal paths.
- Hear Partials alone. This is the cleaner, explicitly tracked oscillator bank.
- Hear Tonal Residual alone. This is the more source-like tonal body left outside that bank.
- Change one transform while its path is isolated.
- Recombine Partials, Tonal Residual, Transient, and Noise before making the final judgement.
For Strata, use the same method with Strike, Body, Air, and Tail. Balance the roles before changing the six learned layers; otherwise a quiet role can make a useful structural change seem ineffective.
Balance first, transform second
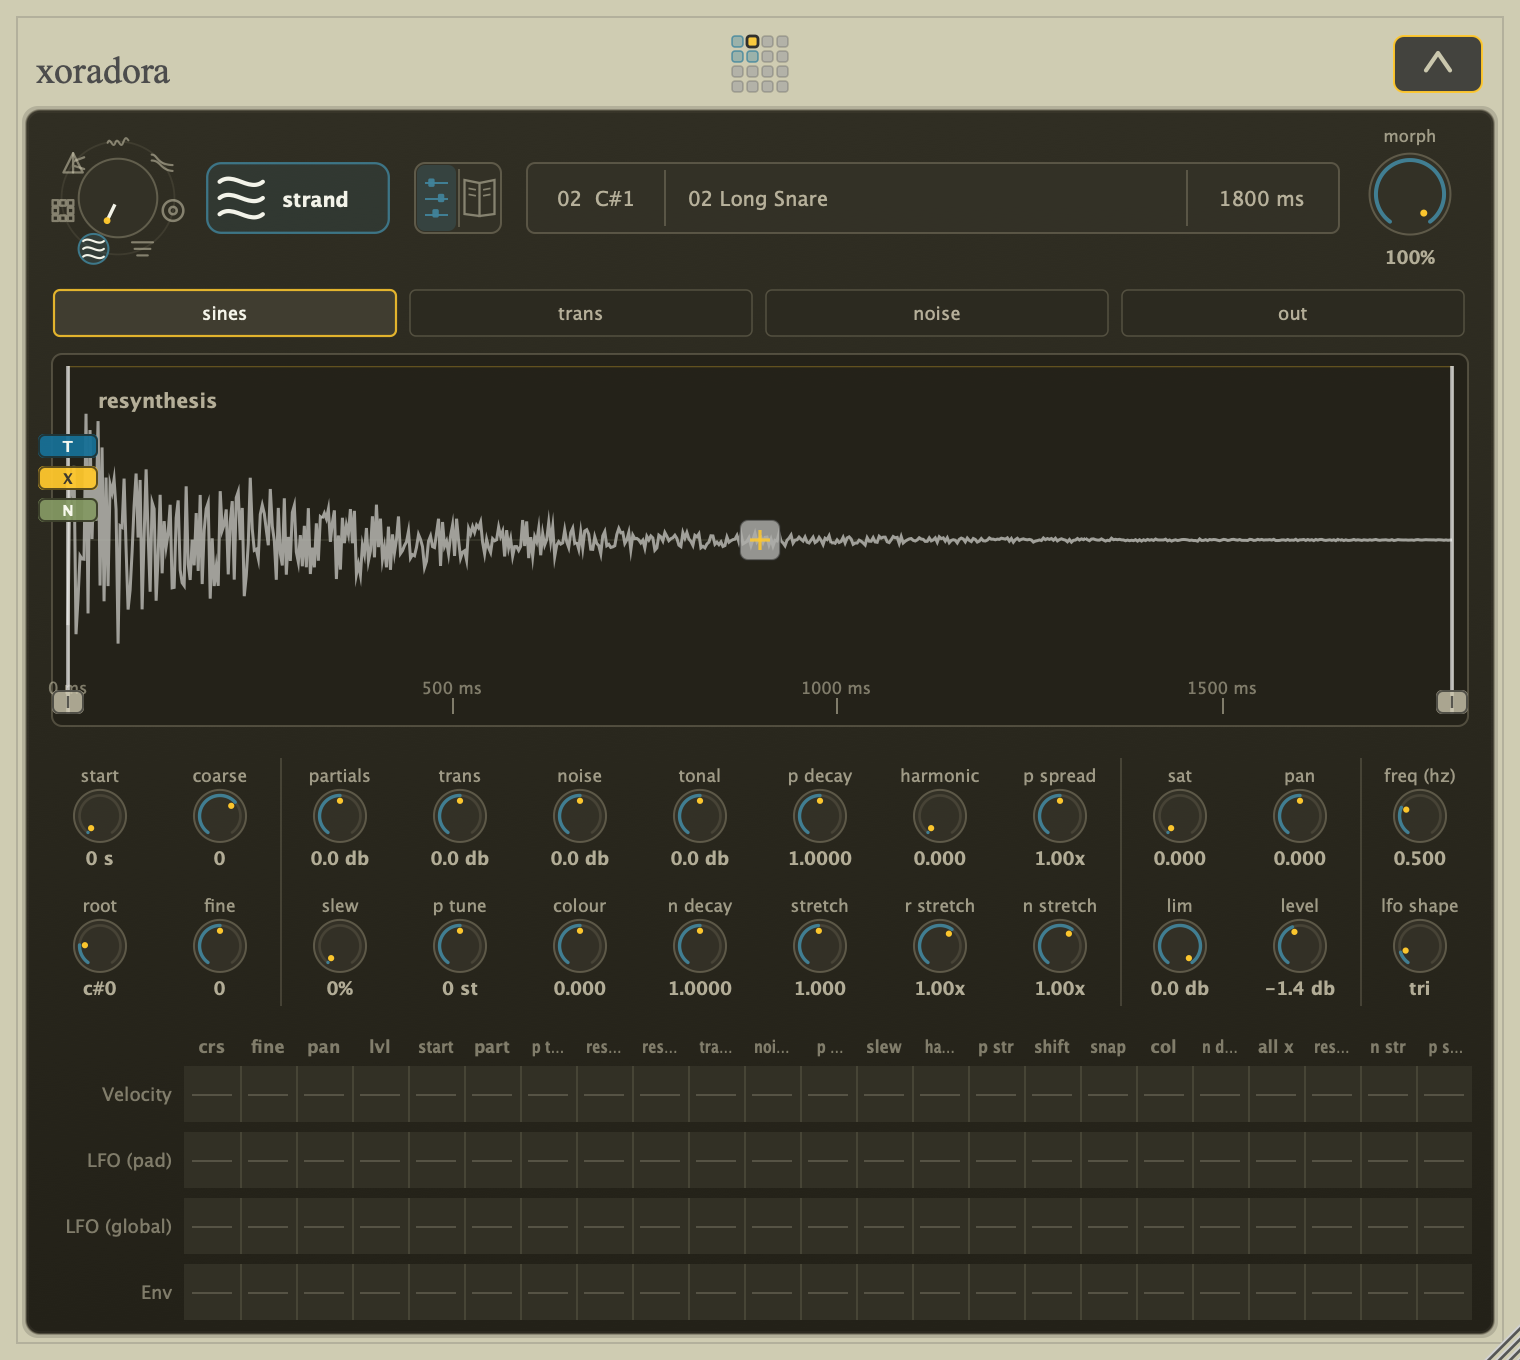
- Partials, Transient, Noise, Tonal Residual: isolate briefly, then recombine.
When a change is still being prepared
Some controls describe a new analysis or cached render rather than a cheap audio-rate change. During preparation, Xoradora keeps the current playable result instead of interrupting the sound.
When a change appears delayed:
- Stop moving the control.
- Allow the new result to finish.
- Retrigger the pad.
- Compare only after the new hit is playing.
Halo, Prism, Grain, and Strata commonly use prepared results. Warp Harmonic and some Strand analysis or quality choices can also require background work. Analysis controls are poor candidates for rapid host automation; animate Morph or a render-time control when you need continuous musical movement.
The old sound can remain active while a new analysis is prepared
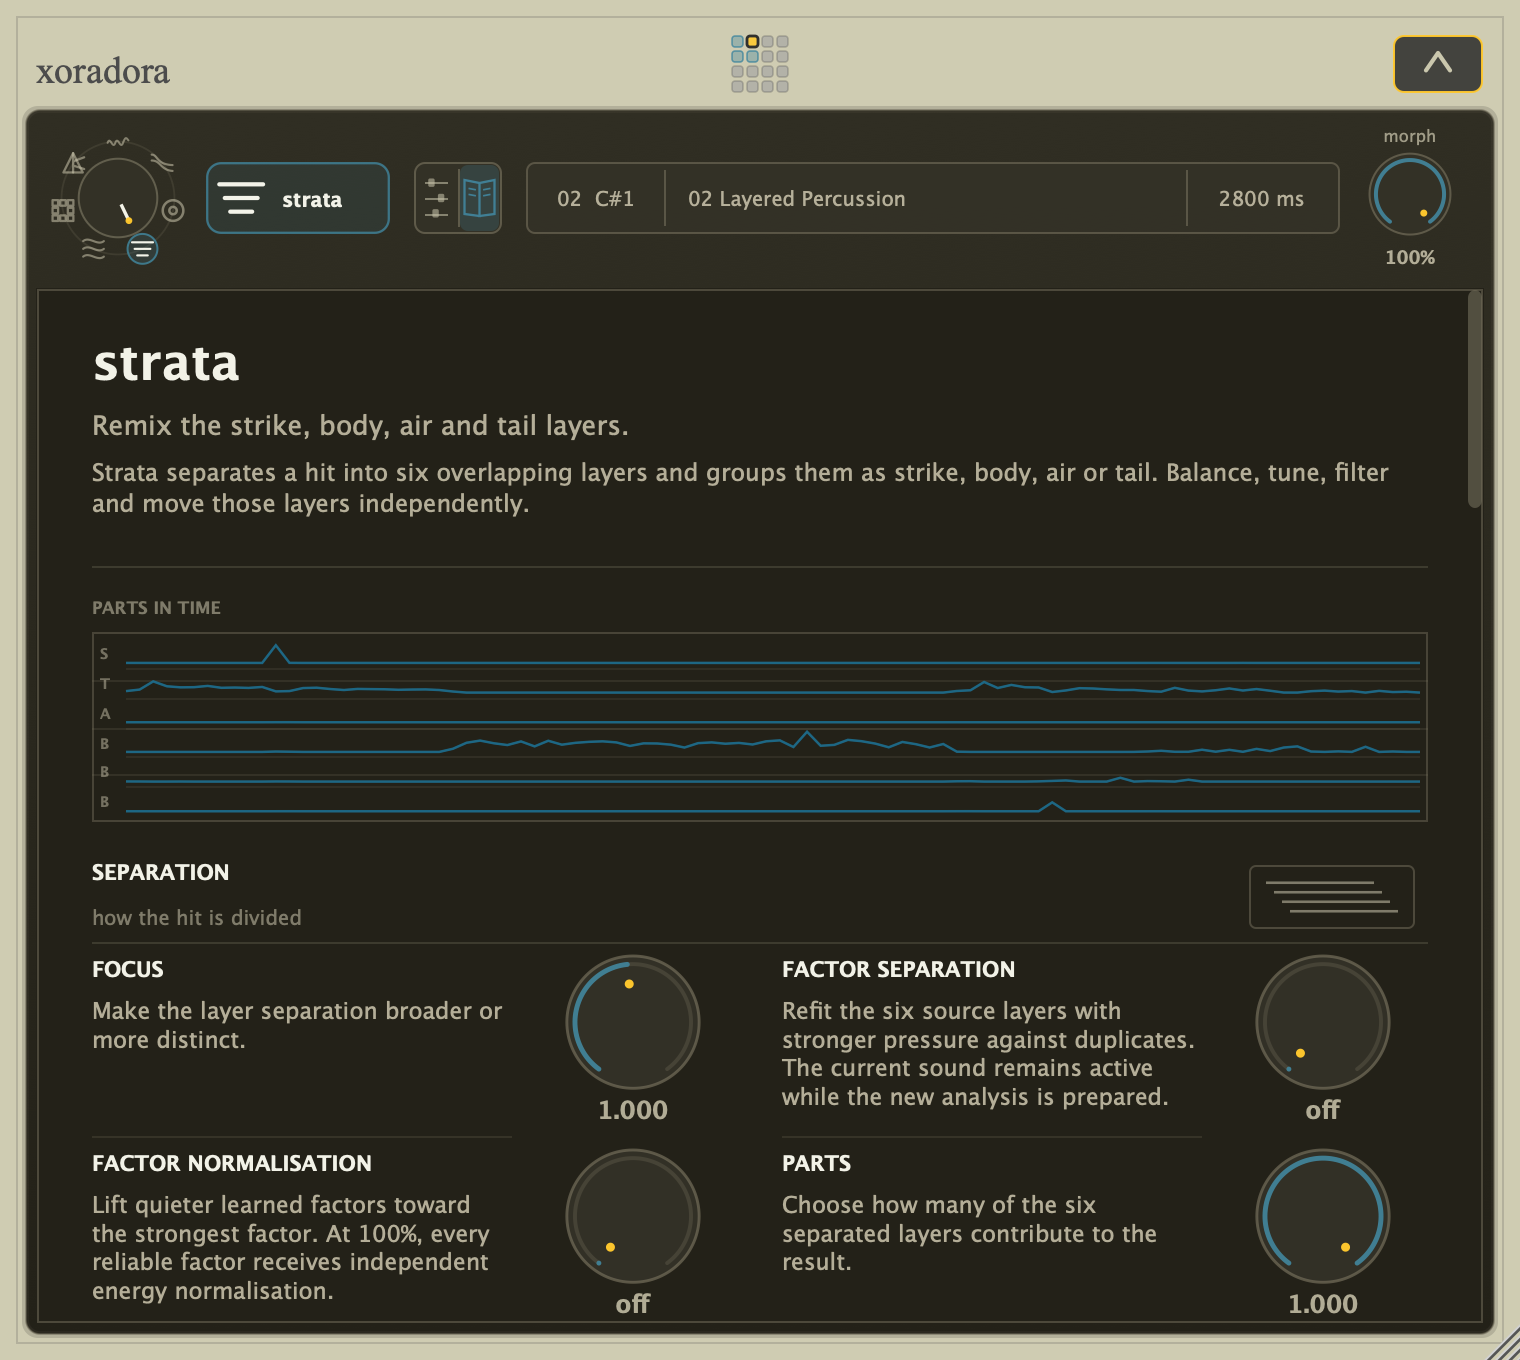
- Factor Separation can request a replacement analysis.
- Factor Normalisation can also change the prepared learned result.
Workflow troubleshooting
Neutral sounds unexpectedly processed
Check the Root-note audition, Morph 0%, full trim, Playback Start 0%, zero Coarse/Fine, ordinary output settings, and disabled modulation/envelopes. Neutral means the selected model's own reconstruction, not dry sample playback.
A body edit removed the character of the hit
Restore the model's attack/source-like path from the table above. Do this before adding broad gain or brightness.
A held voice ignores a routing change
Output bus assignment is captured when the voice is triggered. Change the route and play a new hit. Existing ringing voices intentionally remain on their original bus.
A parameter move sounds different on every hit
Check velocity modulation, pad/global LFO lanes, envelopes, and random or stable-variation controls. Disable one source at a time rather than resetting the patch.
Automatic tuning chose the wrong pitch
The pitch estimate may be following an overtone or may be unreliable for noise, sweeps, or very short hits. Undo the action, tune Coarse/Fine by ear at the Root note, and use Harmonic only if you want the model to acquire a more stable pitched identity.
Preserve credits with a shared kit
attribution.json is optional. Xoradora does not require it to create, load, export, or share a .xorakit, and does not decide what users may do with their kits. Add it when you want your own credit to remain with a kit or want to carry credits you choose to give other contributors and source authors. If you include the file, record only what you know and leave unknown fields unresolved rather than guessing. The file carries information; it does not grant or restrict permission to use or share the kit.
Report a problem or crash
If Xoradora crashes, hangs, fails to load, loses work, or simply behaves in a way that seems wrong, please write to dev@mutagene.net. Any report is useful, even if it is only a short description or a screenshot. You do not need to diagnose the problem or collect everything listed below before getting in touch; send what you have, and the developer can ask follow-up questions.
A crash report or dump can make a difficult problem much easier to locate. If one is readily available, the original report is more useful than a screenshot of part of it—but a screenshot is still better than no report.
Helpful details, if available
Include whatever is easy to find. Missing items should not stop you from reporting the problem.
- The installed Xoradora release: use the version shown by the DAW's plug-in information or the About window when present; otherwise include the exact installer or download filename and when it was installed.
- Operating-system version and CPU architecture; for example, macOS on Apple Silicon or Windows x64.
- DAW name and version, and whether Xoradora was loaded as VST3, AU, AUv3, or Standalone.
- The date, local time, and time zone of the failure. This identifies the matching report when several host crashes exist.
- Whatever you remember doing before the problem, especially the last control, MIDI event, file import, or transport action.
- Whether it has happened more than once, and anything you have already noticed about when it does or does not happen.
- For playback-related problems, any audio settings you happen to know, such as sample rate, buffer size, audio device, or output-bus configuration.
- A small project,
.xorakit, pad template, MIDI file, or audio sample that shows the problem, if one is easy to prepare and can legally be shared. There is no need to delay the initial report while making a minimal example.
This optional template can be pasted into the email. Delete or leave blank anything you do not know:
Xoradora version:
Operating system and CPU:
DAW and version:
Plug-in format:
Failure time and time zone:
What failed: crash / scan failure / project-load failure / hang / other
Steps to reproduce:
Expected result:
Observed result:
How often it happens:
Also happens in a new empty project? yes / no / not tested
Also happens in Standalone? yes / no / not available / not tested
Sample rate, buffer size, audio device and outputs:
Attached crash report, dump, project, kit or sample:
Finding a macOS crash report (optional)
macOS may already have recorded useful information. If you are comfortable collecting it:
- Note the approximate time of the crash. There is no need to reproduce it solely to obtain a more exact time.
- Open Console, select Crash Reports in the sidebar, and find the
.ipsreport with that timestamp. Apple documents this view in View reports in Console. - For the Standalone, the report normally names Xoradora. For a plug-in, it may instead name the DAW, plug-in scanner, or AU hosting process because that is the process which crashed. Open the report and check that Xoradora appears in the crashed thread or loaded binary images.
- Choose File → Reveal in Finder and attach the complete
.ipsfile. User reports are also normally stored under~/Library/Logs/DiagnosticReports/. If only Console can see the report, copy its complete contents into a plain-text file.
For a repeatable freeze rather than a crash, open Activity Monitor, select the DAW or Xoradora Standalone process, choose More (…) → Sample Process, and save the generated report before force-quitting. Apple describes Sample Process in Run system diagnostics in Activity Monitor.
Finding Windows crash information (optional)
Windows and the DAW may have recorded one or more of the following. Any one of them can help; there is no need to find them all.
- Check the DAW's own crash-report or support-package folder first. Attach the package whose timestamp matches the failure; plug-in crashes are normally recorded under the DAW or scanner process name rather than
Xoradora. - Open Event Viewer → Windows Logs → Application and find the Error at the crash time, commonly Application Error event 1000. Copy the complete General entry and the Details → XML view into a text file. Include the faulting application, faulting module, exception code, and report ID. Microsoft describes these application-crash records in The application or service crashing behavior troubleshooting guidance.
- Check
%LOCALAPPDATA%\CrashDumpsfor a.dmpnamed after the DAW, scanner, or Xoradora Standalone and created at the same time. This folder only receives dumps when Windows Error Reporting local dump collection has been enabled, so it may not exist. - If there is no dump, send whatever you have. If more detail is needed, the developer may ask whether you are willing to enable a process-specific Windows Error Reporting dump for a later run. Microsoft's Collecting User-Mode Dumps documents the mechanism and its default dump folder; it requires administrator access and should be configured for the process that actually crashes.
An Event Viewer entry identifies the failing process, module, and exception code, but it does not contain a complete stack trace. A matching .dmp, the Xoradora version, and reproduction steps greatly improve the chance of reconstructing the failure against the correct build; please still report the problem when those are unavailable.
Privacy and file size
Crash reports can contain user names and local file paths. Memory dumps can also contain portions of the DAW's process memory. Review reports before sending them, treat dumps as potentially sensitive, and do not include licence keys or audio you are not permitted to share. Zip large reports; if the archive is too large for email, send the written report first and ask for an upload method. If redacting a text crash report, retain its exception information, crashed thread, binary-images or module list, UUIDs, and timestamps.